Reclaimed white oak guitar table
Back story
This has been a relatively long-term project, but it’s base is interesting. I have to admit it, I got lucky. My girlfriend found someone who was giving away some white oak stairs and balusters; they had been in storage for a while, and they’re dry, so I thought I’d make something like a table and maybe prepare it for some future projects.
For this project, I used:
Tools
Materials
| Qty | Material |
|---|---|
| 8 | #8 Screws – 2 1/2″ |
| - | Titebond III |
| - | Cutting Board Oil |
| 4 | Threaded inserts |
| 4 | Hexagonal bolts – 1 1/2 long, 1/4 wide |
How I went about it
-
Prepare the wood
I originally figured I’d use my hand planer to both flatten the wood and remove any finishes on the pieces of wood, but it was quite obvious there was no way I would finish this before… any day, really, so I went out and bought an electric hand planer; talk about an upgrade!
-
Rip and glue up
To rip my steps and remove the nosing, I clamped a perfectly straight piece of wood to my table saw fence and ran them through. I can’t tell for which reason exactly my rips weren’t perfectly straight because my fence wasn’t tall enough for my wood piece to be clamped strongly enough, my table saw tilted a bit on my table when I pushed my wood through, and my blade is just a tad too small for the thickness of the wood, so I had to go through in multiple passes.
Once they were all ripped, I clamped my work pieces together, and glued them up. Due to the minor offsets, I had add filler between my work pieces and let it dry overnight; being such a small project, I am not worried about it coming apart, especially considering my legs will give proper support under the whole table.
-
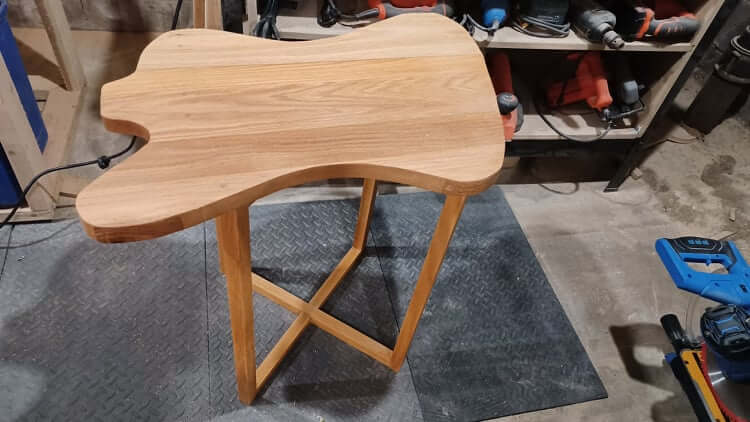
Carve out the design
I wanted to shape the table in the form of a Gibson 1963 Firebird V guitar, a real beauty! Knowing my way around Adobe Illustrator, I traced the image and made sure my outline was at full life size. I then taped some paper on screen and traced on paper my outline and laid it all out on my glued up table top. Once all in place, I used thumbtacks to keep my papers in place. Then, using a precision knife, I traced the shape of my table which I then retraced with a sharpie to be sure I could always see it.
Using my jigsaw, I made a very rough outline just to remove any excess that could be in my way. Using my plunge router, I then traced the outline of the table though multiple passes, making sure I followed the outline I traced. After a few passes, I was about half depth, and about as far as my router bit would go, so I finished the cutout using my jigsaw again. I then switched to a flush trim bit to have a straighter edge. It wasn’t perfect, but I knew I would sand it afterwards so that didn’t bother me.
The general shape wasn’t perfect, in part due to my outline not being perfect when I pinned it down, and it probably moved while I cut it out, and in part because I was scared of going too far in while cutting out my shape. In either case, I tried to cut it down using the jigsaw and router, but I never got to where I wanted. It’s not perfect, but at some point, with the experience I have so far, sometimes, close enough has to be good enough.
-
Finishing the table top
Lots and lots of sanding later (80-120-220 grit), I made sure I had plenty of oil all over the table top on both sides and all around.
-
Creating the legs
To make the table legs, I used some balusters and cut them up to the size I wanted. With those pieces cut, I used my drill press to pre-drill some countersink holes on the ends of my legs; I then thought I’d cut some plugs to hide my screws, which seemed like a good idea. With everything in place, I screwed each piece together and added glue to each joint, except for both ends of one of the legs. The next day, once everything had dried straight, I assembled everything, glued the last piece in place and started oiling everything to match the table top.
-
Hardware and assembly
Once the oil had time to sink into the table legs a bit, I used some painter’s tape to identify the legs final locations. Using a thin drill bit, I marked the location for the hardware through the legs and onto the under side of the table top. I then removed the legs and drilled holes 3/8th for the threaded inserts. Every so often, I verified my depth to make sure the insert was as flush as possible without drilling through the table — although I did go through once…! Once all four inserts in place, I could finally assemble the table and call it a day.
-
Little extras
Nothing like a complementary project to pass some scraps. So with a piece of scrap wood around the guitar head, I’ve made some guitar-pick themed coasters by cutting a rounded triangle-ish shape. I sanded them just like the table with some 80-120-220 grit and oiled them up nicely.
Key takeaways
-
Blades are not one-fits-all
I need multiple table saw blades. The same blade should not be used for ripping and cross-cutting. Also, the type of wood (soft vs hard) may have an impact.
-
Full size designs should be printed out
Although the paper trace of my screen was good enough, I think a life-sized print would have been better and more accurate. From there, only my woodworking skills would account for errors, not a more-or-less accurate paper trace of a computer screen.
-
Learn to walk before you run
It may not be the best idiom for the situation, but it says it all. I’ve went ahead just a little too fast and assembled everything before I cut my half laps. The first one was alright, but the second cut was already too wide, so I had to start over. I cut every piece again and went ahead with my half lap cuts. Because I was too excited, I went too fast again; I assembled everything and had it all set overnight, glued up. Unfortunately, I forgot to take into consideration that I needed one piece unglued so I could cross them so I had to remove a piece once again and cross them my legs. Thankfully I didn’t break anything so I could do it again. Lesson is simple: slow down and take your time, buddy!
-
Location, location, location
Keep track of every move and dimensions of all materials used. While putting the legs together, I didn’t mark the location of my screws. When I drilled the holes for the bolts, I met a screw and had to move my bolt just enough that I had to drill another hole next to the original. If I had drilled my holes half an inch to an inch further, all of this trouble would have been avoided.
In my defence, my original plan was to use Figure 8 Fastener Clips to attach the legs to the top, but I changed my mind due to various reasons including a quantity/cost ratio and difficulty with nesting the fastener clips in the legs.